This post is about the start of a small effort to show our gratitude for those who were there supporting us on our wedding day and for those who could not be physically present.
I was predictably emotional on our wedding day. Among the wide array of feelings coursing through me, there were some which I did not expect. One of the more surprising was a feeling of invincibility. Invincibility may seem like a strange description of what you feel when getting married so I'll try to explain. The love and support from our family and friends gave us what felt like a protective aura, nothing could ever stop us.
Life is full of challenges and I don't expect our marriage to be an exception. Yet, it is clear to me that we care deeply about each other and are willing to put each other before ourselves. We are blessed with loving families and friendships and can count on their example and their support to get us through tough times.
The prototype
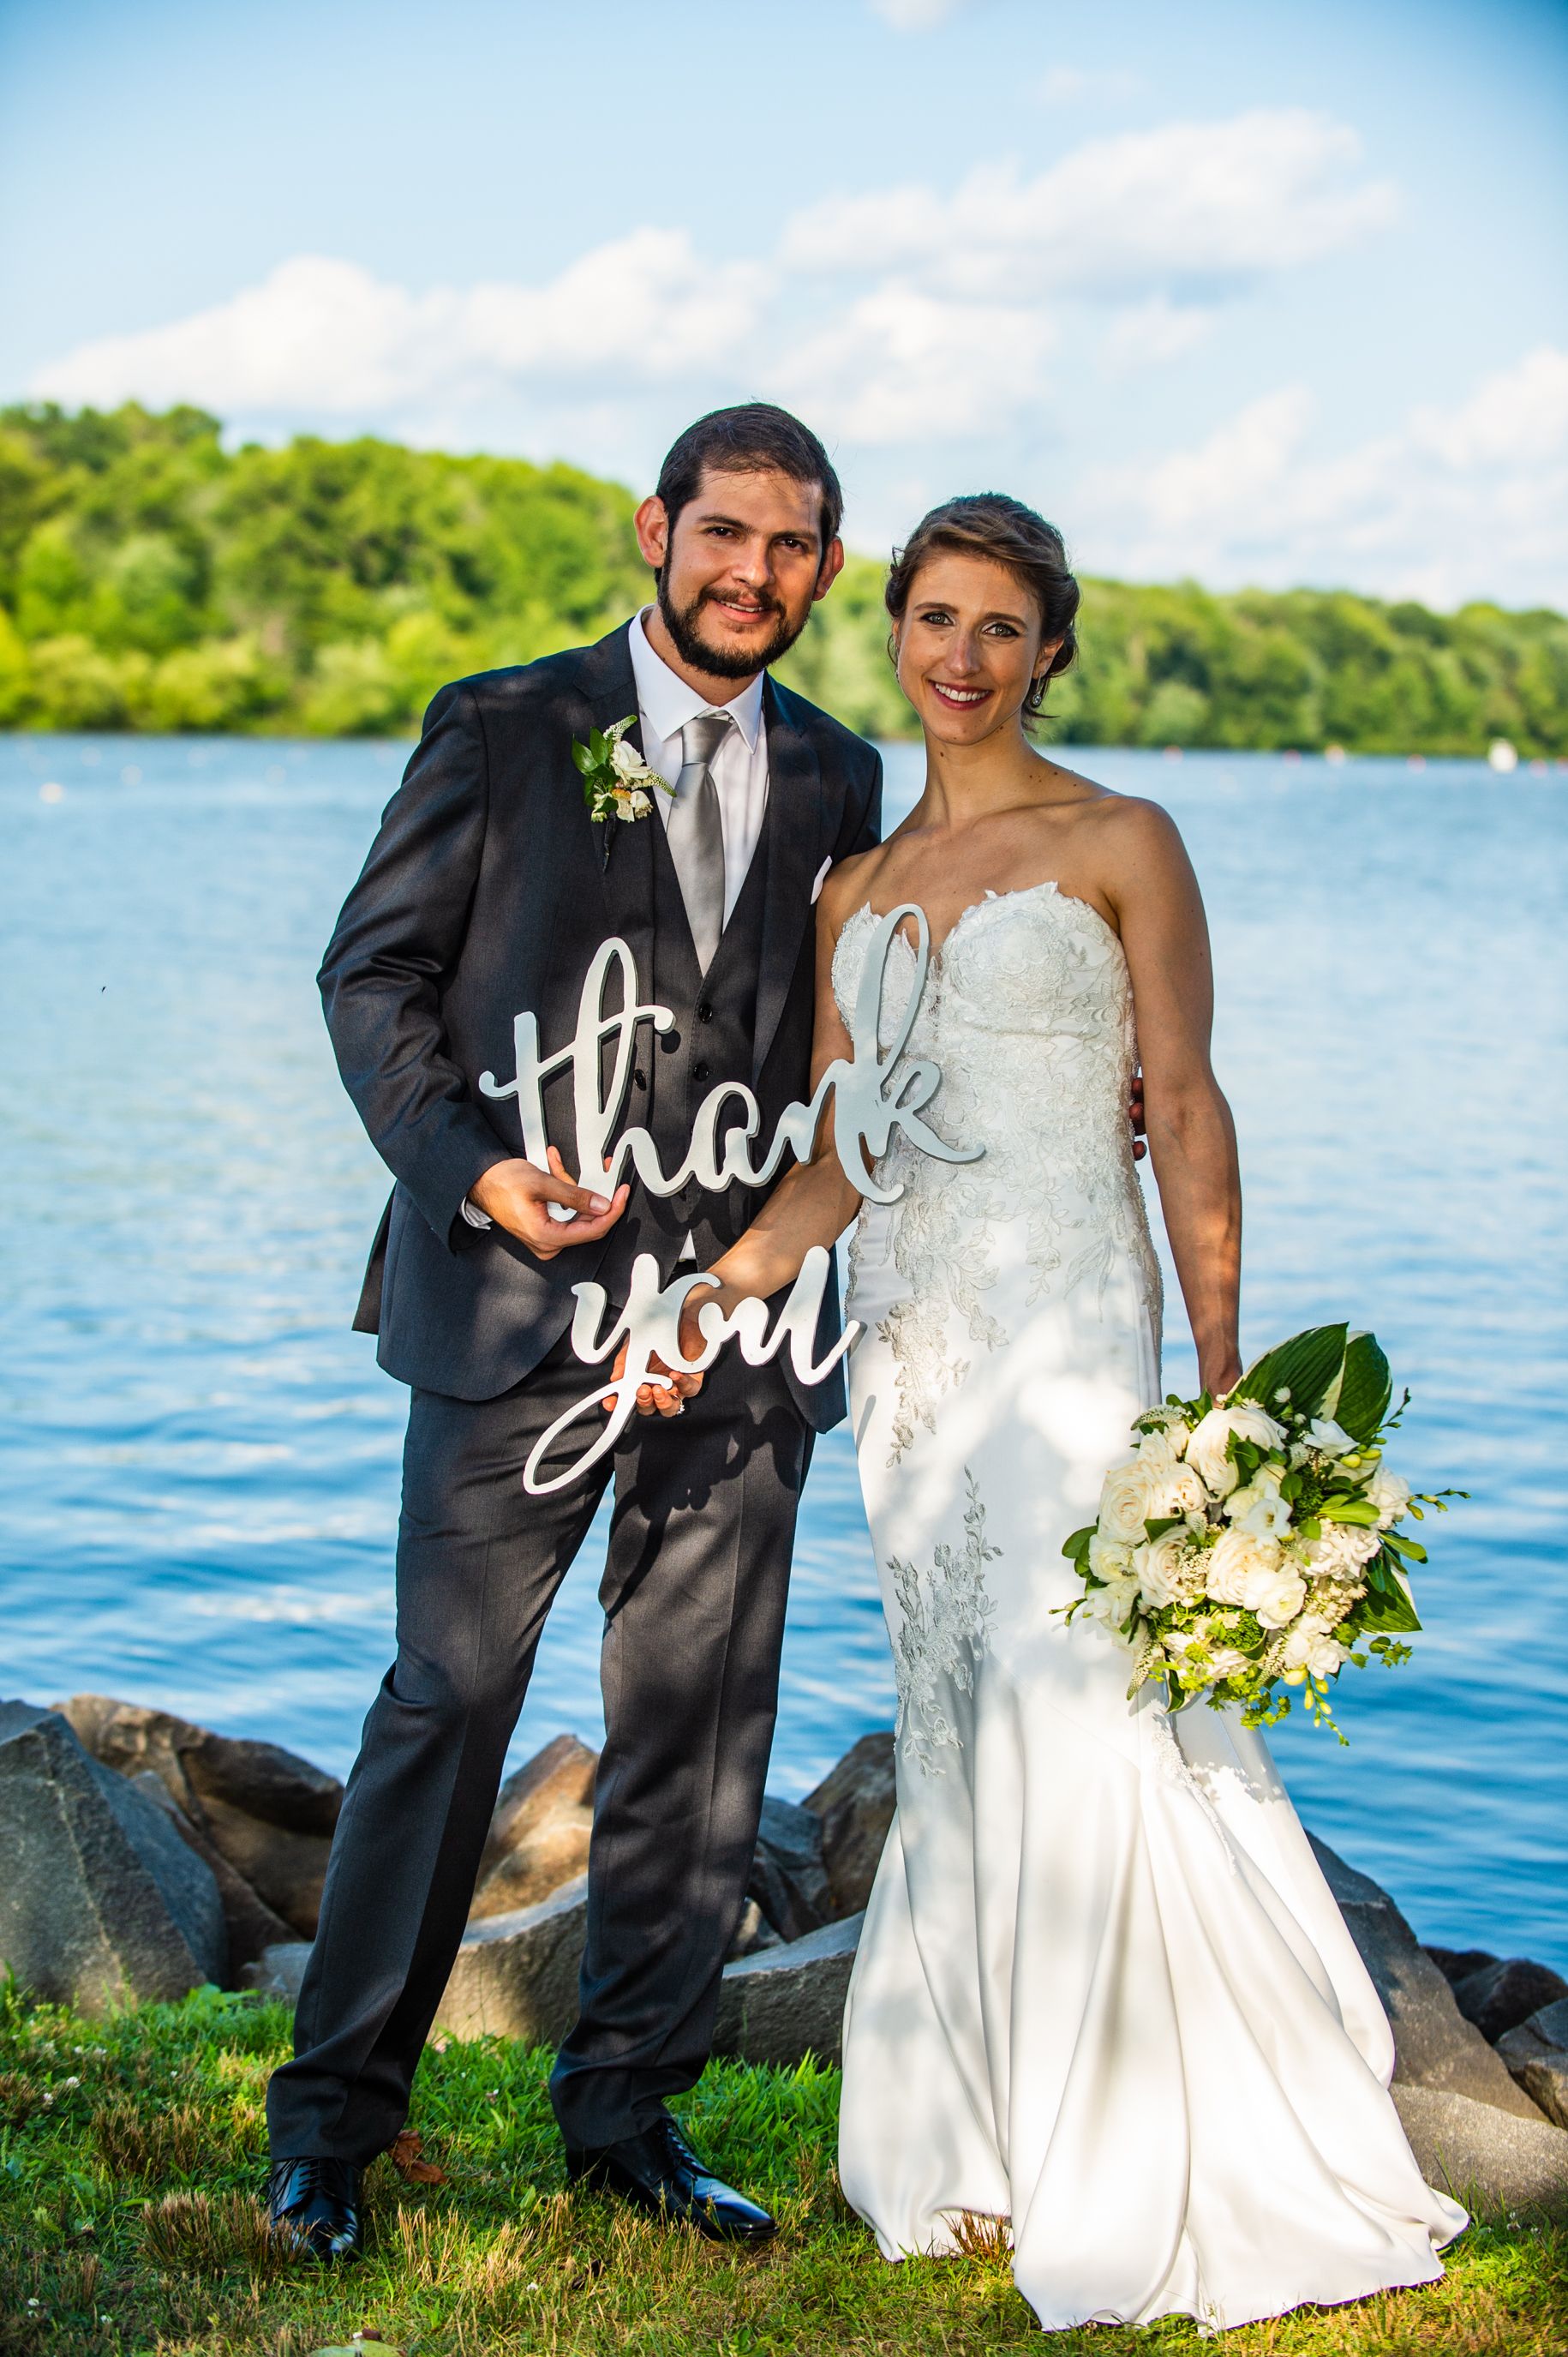
Our wedding photographer Dariuz does not limit himself. He took over eighteen hundred lovely photos at the wedding including the one we are using for our thank you cards:
As Melissa handwrites the messages on the cards, I thought it might be a nice gesture to make personalized digital photo albums for our guests based on the photos they appear in.
The amount of automation achievable for a task like this one would have been limited just a few years ago but the field of image recognition has seen enormous improvements recently thanks to advances in machine learning. There are a ton of related resources available online (open source code, examples, libraries, tutorials, etc.) that I was happy to be able to leverage.
So far I put together a rough prototype in python and started working on productionizing it.
Overall, I was quite impressed with what can be accomplished with a search engine, a few scripts, a laptop, and a bit of tenacity. It is an exciting time to be coding, we truly stand on giant's shoulders.
Since this was my first foray into face recognition and image detection I decided to write this post to discuss the prototype and share what I learned putting it together. I plan to have additional posts describing further refinements as well as steps I am taking to productionize the app.
I'll try to reference the resources I used as accurately as possible as I write. I also include a list of sources and reading material in the References section.
The prototype's functionality is as follows:
- Detect and crop faces in preparation for scoring
- Score photos to obtain a sort of image fingerprint
- Calculate differences between image fingerprints to find matching faces
For my initial take at this I'm using the following software libraries:
- OpenCV - An open source c++ library for computer vision with a python api
- DLib - An open source c++ library for machine learning also with a python api
- Pre-trained image detection and alignment models from CMU's OpenFace project
- Tensorflow - a machine learning framework used to load trained models and score predictions against them.
I'll break down the different activities the prototype performs and show some example code, but first a quick detour on docker.
Sidenote: python dependency management
To get around having to modify my operating system python installation, I ended up using docker to manage dependencies. I could have used python virtual-env but I knew I needed to dockerize anyway for production later on (more on this in a future post).
Here's my Dockerfile:
FROM ubuntu:18.04
LABEL Maintainer="Sebastián Estévez <estevezsebastian@gmail.com>"

RUN apt-get update
RUN apt-get install -y python-pip build-essential cmake \
  pkg-config libx11-dev libatlas-base-dev \
  libgtk-3-dev libboost-python-dev

ADD requirements.txt ./

RUN pip install -r requirements.txt

RUN mkdir foto-app

WORKDIR foto-app

COPY ./ ./

#CMD /bin/bash
CMD python foto-app.py
Notes: This handles both OS dependencies like `libatlas-base-dev` and python libraries in `requirements.txt`. For debugging purposes I'll sometimes uncomment the /bin/bash CMD instead of the python CMD.
I keep the commands for docker build, run, stop & remove, and exec in my bash history, easily accessible with ctrl-r and do most of my testing within the container.
docker build -t foto-app .

docker stop foto-app && docker rm foto-app

docker run -p 5000:5000 -v ~/Pictures/wedding:/foto-app/images --name foto-app -d -t foto-app

docker exec -it foto-app /bin/bash
Note: I'm mounting a host volume to hold my input photos and store my results. I also forward port 5000 to troubleshoot the service once I was satisfied with the prototype and started working on the service (more on this in a future post).
Where are the faces?
The neural network for image fingerprinting I am using was pre-trained by folks at CMU against zoomed in images of faces. As a result, the first step had to be detecting the faces in my raw photos and then aligning and cropping them in order to score them against the neural network. The resulting score, which I have been calling a fingerprint, is a distilled representation of the face, its most useful property being that it can be compared with another fingerprint to obtain a sort of distance or dissimilarity metric.
In short, I first had to determine where the face was in the photo before I could find out to whom it belonged.
Load images into arrays
First I load the image from a file [or a byte array in the case of a web service] using OpenCV's `imread` or `imdecode` functions respectively.
Both of these functions return a channel array representation of the pixels in the image formatted as BGR (for whatever reason blue is flipped with the red as opposed to the traditional rgb ordering used in most image and color formats).
Let's do an example:
We can create a 3d numpy array that represents a blue dot or pixel (blue = 255, green = 0, red = 0) and write it to a jpg
manualMatrix = np.array([[[255, 0, 0]]])
cv2.imwrite("test.jpg", manualMatrix)
Inversely we can read the file back and get the BGR numpy array:
imgMatrix = cv2.imread('test.jpg', 1)
print(imgMatrix)
Which returns:
[[[254 0 0]]]Interestingly the blue value we got back turned out to be a bit less blue than the value in our original matrix; likely a result of jpeg lossyness.
Once we have this matrix representation of the pixels in the image (three values for blue, green, and red laid out in rows and columns), we can manipulate them with our image detection algorithms to find our faces.
Detecting faces in the image array
OpenFace includes python code for dlib powered face detection and alignment (align_dlib.py). For my prototype I pulled the alignment code verbatim from the openface repo. I also downloaded the binary representation of the pre-trained face detection model they use from the dlib website.
Having done that, loading and running the face alignment functionality is trivial:
from align_dlib import AlignDlib

# Initialize the OpenFace face alignment utility
alignment = AlignDlib('shape_predictor_68_face_landmarks.dat')

#load real file and flip r and b
imgMatrix = cv2.imread('MS80418-999.jpg', 1)
imgMatrix = imgMatrix[...,::-1]

alignedImg = alignment.align(96, imgMatrix,

alignment.getLargestFaceBoundingBox(imgMatrix))

cv2.imwrite("aligned.jpg", alignedImg)
and here is a sample result (also note that I didn't flip back my reds and blues so the image appears blueish upon rendering):

Under the hood, openface's this function uses dlib's `get_frontal_face_detector` to find the largest face in the image and then crops it's matrix representation. It turned out that this face detection method did not do exactly what I needed it to for my final implementation but it was good enough for the prototype.
Who's face is it?
At this point `imgMatrix` is ready for fingerprint extraction.
global nn4_small2_pretrained
nn4_small2_pretrained = create_model()
global graph
graph = tf.get_default_graph()

nn4_small2_pretrained.load_weights('weights/nn4.small2.v1.h5')
In the snippet above, we load the OpenFace pre-trained model `nn4.small2.v1` using tensorflow. Python's `global` keyword makes the graph and the model accesible from multiple threads. This specific detail wasn't relevant for the prototype but would be for the final implementation.
img = (alignedImg / 255.).astype(np.float32)

with graph.as_default():
  fingerprint = nn4_small2_pretrained.predict(np.expand_dims(img, axis=0))[0]
  print fingerprint
I normalize the color values in the matrix by dividing by 255 (the maximum value) to get values between 0 and 1 and feed it to the predict function of the model. The result is an array containing 128 numbers that represent the face.
Finally, to find out how similar two faces are, we can take the sum of the square of the differences of each value in the two arrays.
  diff = np.sum(np.square(fingerprint1 - fingerprint2))
  print diff
This diffference function allows us to empirically select a threshold above which we will call two faces a match.
Here are a few examples of matching pairs:
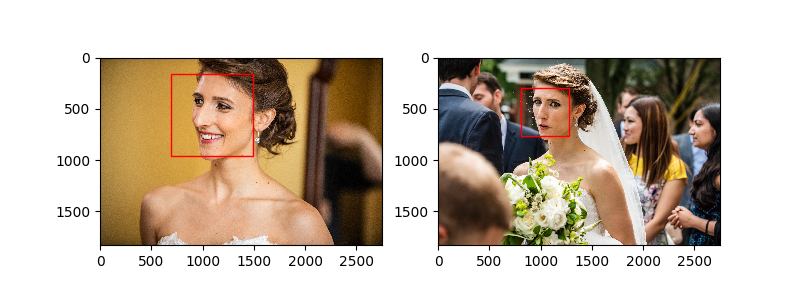
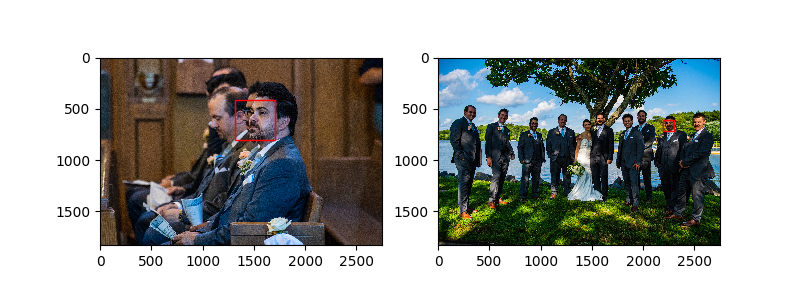
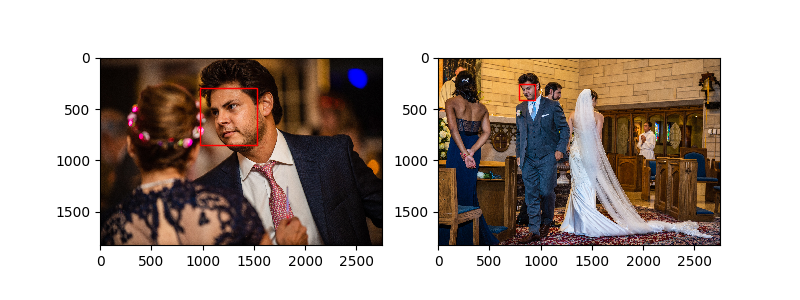
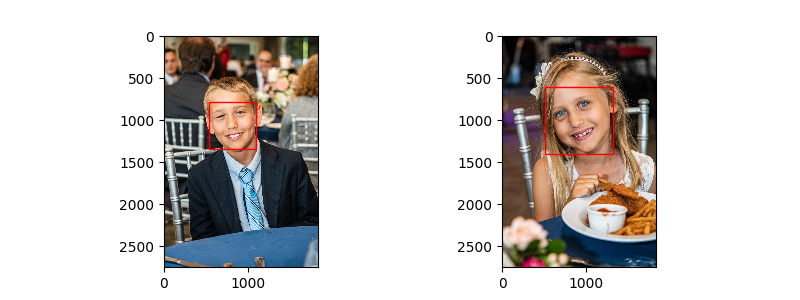
Getting the threshold right can be tricky but in my case we don't have to be perfect. Below, you can see two of my cousin's kids. The robot could't tell them apart even though they are clearly different people, a boy and a girl. In the end, I'll be sending a single album to their family so the robot is off the hook on this one.
Opportunities
I was quite happy with the results from the prototype. My future efforts will be focused on detection improvements to find and match more faces more acurately, on scaling the process accross CPUs and machines, and on integrating it with the google photos API (finally released last year).
References
https://cmusatyalab.github.io/openface/
https://www.learnopencv.com/face-detection-opencv-dlib-and-deep-learning-c-python/
https://arxiv.org/abs/1512.02325